
JFT Series
Digital Programmable Street Light Controller
Introduction
JFT series digital street light controller adopts intelligent micro-processing chip, which can calculate the sunrise and sunset time through the latitude and longitude algorithm according to the operation law of the sun and the earth and the relationship between the latitude and longitude of the earth and the sunrise and sunset. It has the advantages of high reliability, small error, strong stability, and strong anti-interference ability, and can adapt to the needs of different geographic environments. JFT smart street light controller also has a built-in high-energy lithium battery (which can maintain the clock running for more than 10 years without changing the battery), which can effectively protect data in the event of a power failure. JFT intelligent street lamp controller has high-power relay output, which can be directly connected to 220VAC contactor or 380VAC contactor. JFT smart street lamp controllers are widely used in streets, railways, stations, waterways, industrial and mining, schools and power supply departments and other places.
The JFT series street lamp controller can be divided into JFT-6 series and JFT-9 series. JFT-6 series street light controller is wall-mounted and has two output circuits (channel A and channel B). JFT-6 street light controllers have several working modes: full-night mode, half-night mode, and 2on-2off mode. According to whether it contains light control device, JFT-6 series can be divided into normal type and light-sense type. JFT-9 series street lamp controller is rail-mounted and has two output circuits (one normally open and one normally closed). JFT-9 series street light controllers have two working modes: full-night mode, and half-night mode.Parameters
JFT-6 (Latitude and Longitude Control)
Operation Voltage: AC220V/50Hz (or other customized voltage)
Operation Temperature: -15℃~60℃
Operation Humidity:<90%
Switching Capacity: 10A (resistive load)
Working Mode: Full-night mode, half-night mode, 2on-2off mode
Consumption Power: ≤1W
Battery: Built-in high-energy lithium battery
Time Error: ≤±0.5s/day (25℃)
Dimensions: 150×100×48mm
Mounting: Wall image")
JFT-9 (Latitude and Longitude Control)
Operation Voltage: AC220V/50Hz (or other customized voltage)
Operation Temperature: -40℃~70℃
Operation Humidity:<90%
Switching Capacity: 10A (resistive load)
Working mode: Mode 0 (user setting); Mode 1 (latitude and longitude control)
Number of time periods: Mode 0 (once/month); Mode 1 (daily)
Control interval: 24 hours (the minimum step length is 1 minute)
Consumption Power: ≤1W
Time Error: ≤30s/year (25℃)
Dimensions: 100×50×74mm
Mounting: Rail image")
Dimensions & Wiring Diagram
JFT-6
1 JFT6 can carry two loads, LOAD1 (Channel A) and LOAD2 (Channel B). (As shown in Figure 1)
2 JFT6 has two wiring methods, as shown in Figure 2 and Figure 3.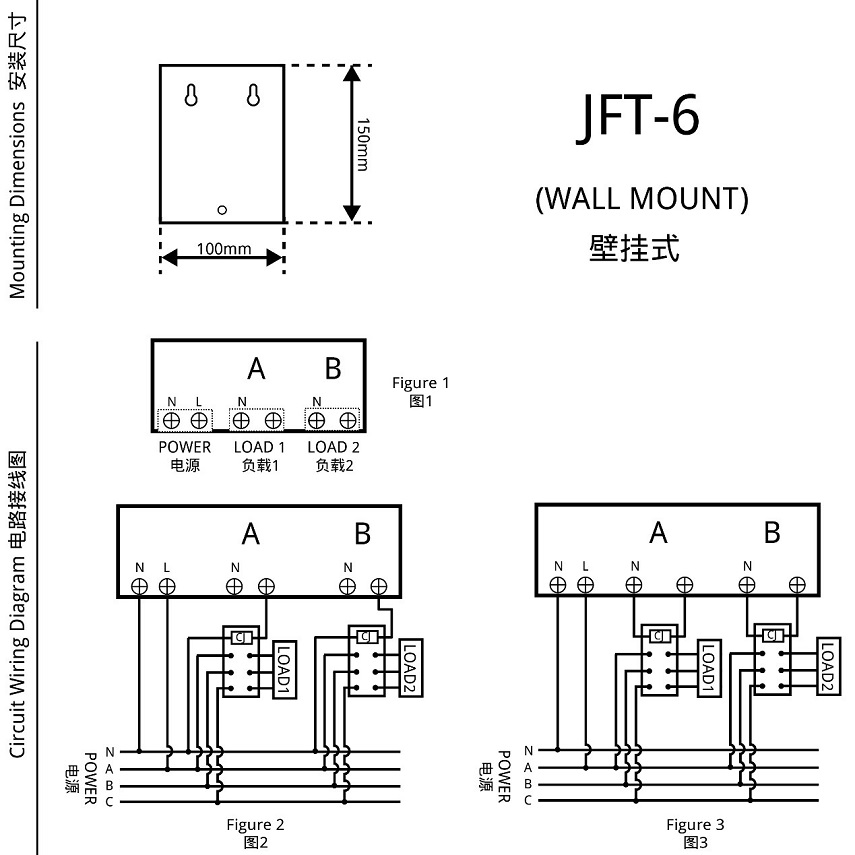
JFT-6 dimensions and wiring diagram
JFT-9
1 Terminal introduction:
PORT 1 and PORT 2 are power terminals; PORT 3 is a normally open contact; PORT 4 is a common contact; PORT 5 is a normally closed contact. (As shown in Figure 4)
2 Wiring diagrams:
2.1 Single-phase power supply-direct control method
If the load is single-phase power supply, and the power consumption does not exceed the rated capacity of the switch. (As shown in Figure 5)
2.2 Three-phase power supply
If the load is three-phase power supply, an external three-phase AC contactor (coil voltage is AC220V/50Hz) is required. (As shown in Figure 6)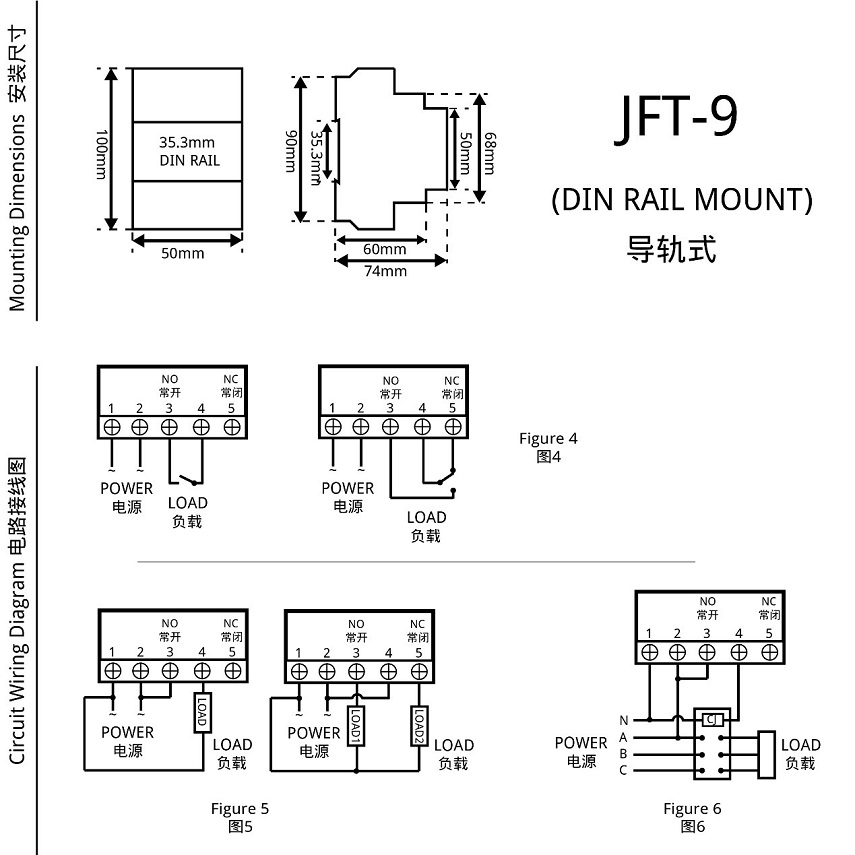
JFT-9 dimensions and wiring diagram
Instructions For Use (How to set JFT-6)
Please make sure that you have understood the functions of all the buttons on the panel (button area), and perform the actual operation according to the instructions.
Ⅰ Description of buttons and indicators
SET/SHIFT: Used to set parameters; in the "Check Mode", the displayed parameter group can be switched.
CHECK/NEXT: Used to check parameters; in the "Setting Mode", it can be used to select the parameters that need to be modified.
MONTH/+: Used to increase the value of the parameter.
DAY/-: Used to reduce the value of the parameter.
MANU/ON: Used to turn on or off the "Manual Mode".
OPERATION LED: When JFT-6 is working normally, the operation LED will flash.
MANUAL LED: When JFT-6 is working in "Manual Mode", the manual LED will always be on.
OUTPUT 1: When the load 1 is connected to the Channel A, the output 1 LED will always be on.
OUTPUT 2: When the load 2 is connected to the Channel B, the output 2 LED will always be on.Ⅱ Description of working modes
1 Automatic Mode
Channel A and Channel B can be set to three automatic working modes-full-night light mode, half-night light mode, 2on-2off light mode. Once set to automatic working mode, the load can be automatically switched on and off every day without human intervention.
Full-night working mode (turn on the lights in the evening and turn off the lights in the morning): According to the latitude and longitude information, the switching time of the street light is automatically controlled according to the seasonal change, that is, the street light is automatically turned on in the evening and the street light is automatically turned off in the morning. You can fine-tune the automatic switching time within ±120 minutes (negative means advance, positive means delay).
Half-night working mode (turn on the lights in the evening and turn off the lights in the middle of the night): According to the latitude and longitude information, the turn-on time of the street light is automatically controlled according to the seasonal change, that is, the street light is automatically turned on in the evening; the turn-off time needs to be set by yourself. You can fine-tune the auto-opening time in the range of ±120 minutes (negative means advance, positive means delay). The midnight light work mode can effectively save power than the all night light work mode.
2on-2off working mode (turn on the light in the evening and turn off the light in the middle of the night, and turn on the light in the early morning and turn off the light in the morning): On the basis of the half-night working mode, it will add a set of time to turn on the street light for a short time (which should be set by yourself) . This mode is often used to provide street lighting for cleaning staff working in the early morning.
2 Manual Mode
Long press the "MANU/ON" button for more than 2 seconds, JFT-6 will enter the "Manual Mode"(or "manual emergency light mode"), at this time JFT-6 will immediately turn on the street lights, and the display will show "MANUAL". In this mode, the switch states of A and B will not be controlled by the program. Long press the "MANU/ON" button for more than 2 seconds, JFT-6 will exit the "Manual Mode", at this time A and B will be automatically switched according to the set program, and the display will no longer display "MANUAL". Manual mode is often used for emergency lighting, equipment maintenance, major celebrations, etc.
3 Light Sensing Mode
If you need to turn on the street lights in advance in the evening of rainy days, you can choose the light-sense type JFT-6 (up to 30 minutes in advance). Compared with the normal type JFT-6, the light-sense type JFT-6 is equipped with a light sensor controller, which can turn on the lights in advance according to the change of natural light based on the latitude and longitude switching time. The light-sense type JFT-6 uses fuzzy mathematics to deal with changes in natural light, so it will not be affected by light fluctuations, artificial lighting, etc. during operation. Because light-sense type JFT-6 adopts automatic adjustment technology, it can effectively avoid the actual illuminance detection error caused by the different installation conditions of the photosensitive device and the drift of the device during long-term operation.Ⅲ Operating instructions
In order to save power consumption, during normal operation, the display screen of JFT-6 will not display anything, only the running light flashes, and the load light (Outpu1 and Output2) is displayed normally. When you press any button or just turn on the power, the LED display will show the "Current Time". If there is no operation, the LED display will turn off after 1 minute.
1 Setting Mode (the detailed process is shown in Figure 7)1.1 Enter/exit "Setting Mode": Long press the "SET/SHIFT" key to enter the "Setting Mode" (buzzer sounds), at this time the LED display will start to flash, and the flashing value is a modifiable value. Exit the "Setting Mode" (buzzer sounds) through long press the "SET/SHIFT" button or without any operation within 3 minutes. At this time, JFT-6 will automatically save the set parameters, and the LED display will no longer flash and show the current time.
1.2 Select parameters: Display the parameters that need to be modified through the SET/SHIFT" key, and select the values that need to be modified through the "CHECK/NEXT" key.
1.3 Modify parameters: Modify the selected value through "Month/+" key and "Day/-" key.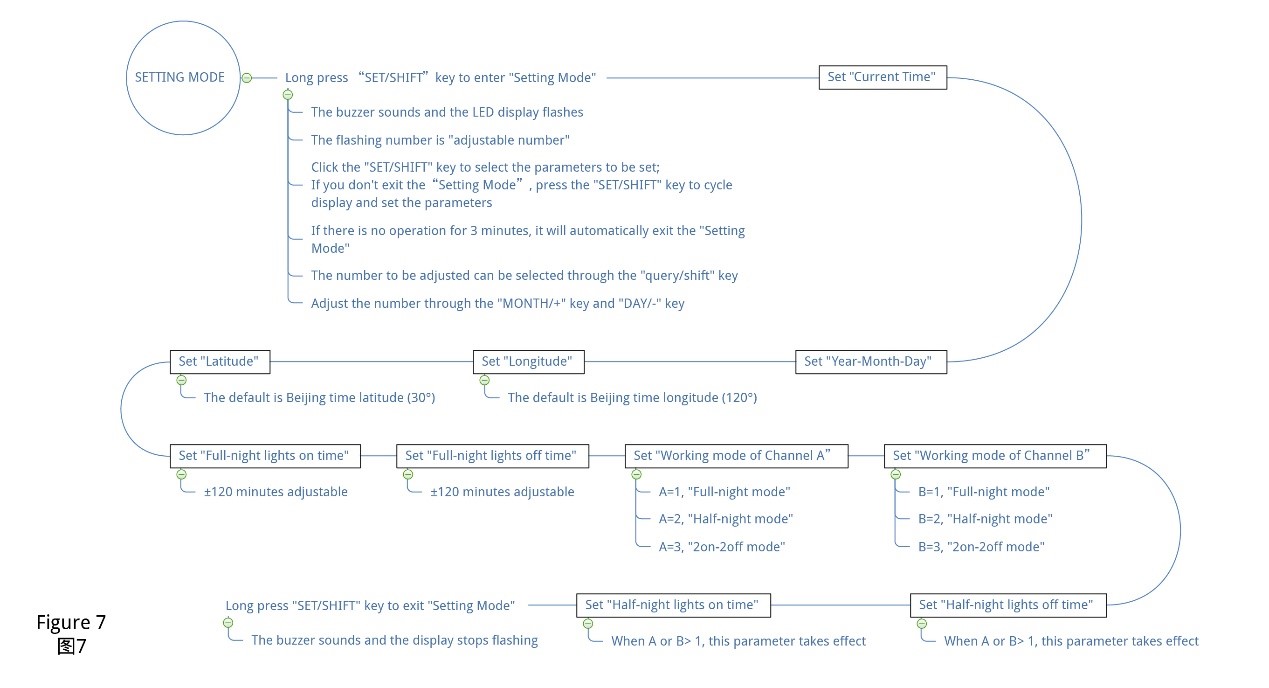
JFT-6 Setting Mode
2 Check Mode (the detailed process is shown in Figure 8)2.1 Enter/exit "Check Mode": Click the "CHECK/NEXT" button to enter "Check Mode"; without any operation within 15 seconds, it will automatically exit "Check Mode", and the LED display will show the current time.
2.2 Select the parameter group: Click the "SET/SHIFT" button to switch the parameter group to be displayed (GroupⅠand GroupⅡ).
2.3 Check each parameter in the parameter group: Use the "CHECK/NEXT" key to view all the parameter values in the selected parameter group.
JFT-6 Check Mode
Instructions For Use (How to set JFT-9)
Please make sure that you have understood the functions of all the buttons on the panel (button area), and perform the actual operation according to the instructions.
Ⅰ Description of buttons and indicators
"⌒" (function): Used to check and modify parameters; also used to turn on or off the "Test Mode".
"∧" (+): Used to increase the value of the parameter; in the "Test Mode", the load can be turned on manually.
"∨" (-): Used to reduce the value of the parameter; in the "Test Mode", the load can be turned off manually.
OPERATION LED:When JFT-9 is working normally, the running light will flash.Ⅱ Description of working modes
1 Mode 0
In mode 0, you can set the switch time of street lights in a certain month, and the time range is from 00:00 to 23:59. Once set, the load can be automatically switched on and off every day without human intervention. In mode 0, JFT-9 is not controlled by latitude and longitude during the set month, and its switching load time will not change with the season, so it can be regarded as a digital timer switch.
2 Mode 1
In mode 1, JFT-9 has two working modes: full-night light mode and half-night light mode. Once set, the load will be automatically switched on and off every day without human intervention.
Full-night working mode (turn on the lights in the evening and turn off the lights in the morning): According to the latitude and longitude information, the switching time of the street light is automatically controlled according to the seasonal change, that is, the street light is automatically turned on in the evening and the street light is automatically turned off in the morning. You can fine-tune the automatic switching time within ±50 minutes (negative means advance, positive means delay).
Half-night working mode (turn on the lights in the evening and turn off the lights in the middle of the night): According to the latitude and longitude information, the turn-on time of the street light is automatically controlled according to the seasonal change, that is, the street light is automatically turned on in the evening; the turn-off time needs to be set by yourself. You can fine-tune the auto-opening time in the range of ±50 minutes (negative means advance, positive means delay). The midnight light work mode can effectively save power than the all night light work mode.
3 Manual Mode
In automatic working mode, press the "∧" key or ∨" key to display the light on/off time of the day. At this time, if you press the "⌒" key again, JFT-9 will enter the "Test Mode" and the display screen will show "TEST". In this mode, the switch state of the load will not be controlled by the program, and it cannot be restored to the "automatic mode" by itself. In the "Test Mode", press the "∧" key to manually turn on the light, press "∨" key to manually turn off the lights. Press the "⌒" key again, JFT-9 will exit the "Test Mode" and restore the "automatic mode". The test mode is often used for emergency lighting, equipment maintenance, major celebrations, etc.Ⅲ Operating instructions
In order to save power consumption, during normal operation, the display screen of JFT-9 will not show anything, and the "Operation" LED will flash. When you press any button or just turn on the power, the LED display will show the "Current Time". If there is no operation, the LED display will turn off after 1 minute.
1 Editing Mode (the detailed process is shown in Figure 9)1.1 Enter/exit "Editing Mode": Click the "⌒" key to enter "Editing Mode"; if there is no operation within 30 seconds, it will automatically exit the editing mode, and the display will show the current time and return to "Automatic Mode". P.S.: In "Manual Mode", JFT-9 cannot exit the editing mode automatically.
1.2 Modification: Use the "⌒" key to select parameters, and use the "∧" key or ∨" key to modify the parameters.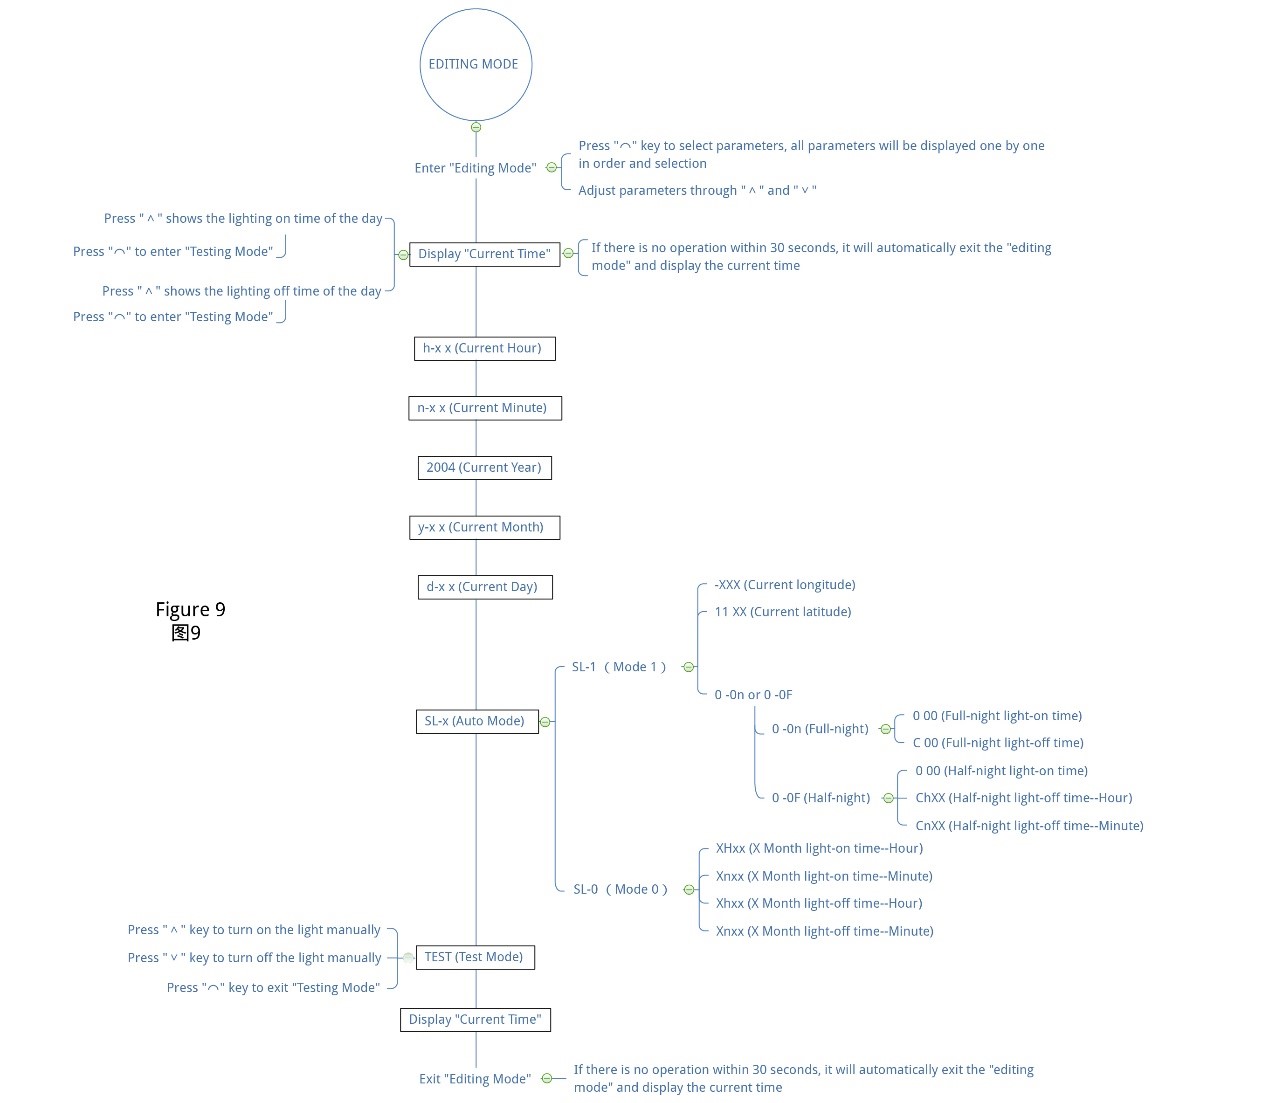
JFT-9 Editing Mode
2 Test Mode2.1 Enter/exit "Test Mode": you can enter "Test Mode" from "Editing Mode" or "Manual Mode"; click "⌒" key to exit "Test Mode".
When you think there is a fault (FAQs)
Note: When the product fails, please disconnect the power first, and then check the equipment!
1 Please check whether the settings are correct
If the product is not set up correctly, then it cannot work as your needs.
2 Please check the insurance tube
Please open the rear seat safety cover (terminal cover) to check whether the fuse has been blown. If it is blown, please replace it with a new 0.1A~0.3A fuse.
3 Please check the power supply
Please check whether the power supply voltage is too low and the product wiring is wrong.
4 Please replace the battery
If the LCD screen does not display or the display is not clear, replace the battery with the same specification.
5 Please contact us or local distributor
If the above methods can not eliminate the fault, please contact our company or local dealer for handling. Do not repair, disassemble or modify this product by yourself. If repairs and inspections are required, please entrust a dealer or other authorized agency.
Get in touch with us now!
Please take a minute or two to complete this simple form to get reply in 24 hours, thank you!
*Please check the trash box of your mailbox, if you do not receive our email.


