
DH48S Series
Digital Time Relay
Parameters
DH48S series digital time relay acts as a delay element in the control circuit, which can turn on or off the circuit at a predetermined time. DH48S series digital time relay consists of large-scale integrated circuit, has excellent EFT and ESD anti-interference ability, and its delay accuracy can reach 0.01 second. DH48S series digital time relay is a device with time-delay after power-on feature, that is, it starts timing after power-on, and after timing is over, it starts to turn on/off the load. Therefore, the time relay must be set before power-on, and the setting after power-on is invalid.
Parameters
DH48S (1 Set of Passive Output Contact)
Operation Voltage: 220VDC, 380VAC/50Hz
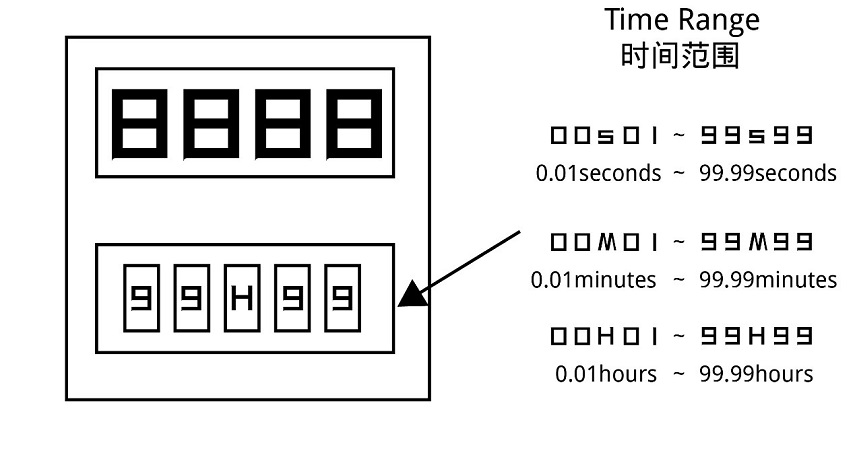
Timer Range: (1) 0.01 sec-99.99 sec; (2) 0.01min-99.99min; (3) 0.01hour-99.99hour
Number of contacts: 1 set of passive output contact
Contact capacity: 5A(250VAC, COSΦ=1); 7A(DC24V)
Service Life: Electrical life (>105times); Mechanical life(>106times)
Temperature: Working temperature (-5℃~45℃); Storage temperature (-20℃~70℃)
Repeat error: ≤1%
Installation Method: Rail/Panel/Device/Welding image")
DH48S-2Z (2 Sets of Passive Output Contact)
Operation Voltage: 220VDC, 380VAC/50Hz
Timer Range: (1) 0.01 sec-99.99 sec; (2) 0.01min-99.99min; (3) 0.01hour-99.99hour Number of contacts: 2 sets of passive output contact
Contact capacity: 5A(250VAC, COSΦ=1); 7A(DC24V)
Service Life: Electrical life (>105times); Mechanical life(>106times)
Temperature: Working temperature (-5℃~45℃); Storage temperature (-20℃~70℃)
Repeat error: ≤1%
Installation Method: Rail/Panel/Device/Welding image")
Dimensions & Wiring Diagram
1 Installation method
Installation method 1: Wiring by welding (Figure 1)
Panel mounting: The hole size is 46mm×46mm.
Installation method 2: Wiring by screw crimping. (Figure 2)
Panel mounting: The hole size is 46mm×46mm
DIN-rail mounting: 35mm rail
Device mounting: The hole distance is 33mm, the installation screw is 2-M4×20mm2 Wiring method
DH48S terminal functions: Port 1 and Port 8 are the common terminals; Port 2 is power + or ~, Port 7 is power – or ~; Port 3 is reset terminal; Port 4 is pause terminal; Port 5 is normally close terminal; Port 6 is normally open terminal.
DH48S-2Z terminal functions: Port 1 and Port 8 are the common terminals; Port 2 is power + or ~, Port 7 is power – or ~; Port 3 and Port 6 are the normally open terminals; Port 4 and Port 5 are normally closed terminals.Features:
Reset function: As long as the reset terminal is turned on at any time, the time relay will return to the initial state (this function is suitable for DH48S).
Pause function: When the pause terminal is turned on during timing, the time relay will stop timing and display the time at the moment; after the pause terminal is turned off, the time relay will continue timing (this function is applicable to DH48S).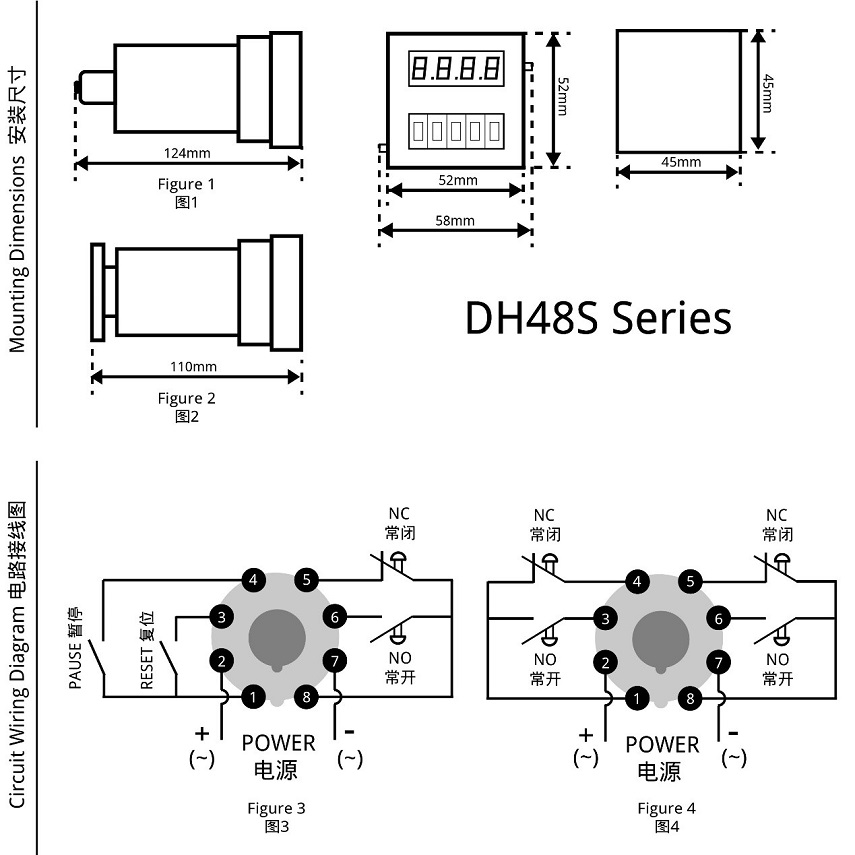
DH48S series dimensions and wiring diagram
Instructions For Use (How to set)
- Step one. Wiring
Connect the load, switch and power supply to the corresponding terminals of the time relay.
Step two. Time settingSet the delay time before powering on. (1) 0.01secs~99.99secs (2) 1sec~99mins99secs (3) 1 min~99hours99mins
Step three. Power upAfter setting the time relay, turn on the power, then the time relay will display and start timing. Once it reaches the set time, the time delay contact starts to act to realize the delay control of the load. The interval between repeated activations of the time relay should be ≥0.5 seconds. Note: The delay time should be set before power on, any setting after power on is invalid.
DH48S Timing Setting
Attentions
1 When using the time relay, please cover the protective cover at any time to prevent dust from invading and affecting its normal use.
2 When the time relay is used in a strong electric field environment, and its reset and pause wires are long, please use shielded wires.
3 Do not connect the input voltage to the reset and pause terminals of the time relay to avoid damage to the time relay.
4 When the load device current is large, please equip the time relay with a contactor.
5 Please do not repair, disassemble or modify this time relay by yourself. If you need repair and inspection, please entrust a dealership or other authorized unit.
6 Please do not touch any terminal on the time relay after power on.
7 The time relay cannot work in humid, corrosive and high metal content gas environment. Do not contaminate the time relay with oil or water.
Get in touch with us now!
Please take a minute or two to complete this simple form to get reply in 24 hours, thank you!
*Please check the trash box of your mailbox, if you do not receive our email.


